Lemon Poppy Seed Muffins

0 komentar


Ho, ho, ho!  Muffins anyone?  Lemon peel gives extra flavour to these moist, citrusy muffins while poppy seeds add in the extra crunch!   Perfect for Breakfast, Tea or snacking!


Recipe for Lemon Poppy Seed Muffins

    Ingredients
    • 3 oz butter
    • 5 oz caster sugar
    • 2 eggs
    • 6 oz plain flour
    • 1/2 cup milk
    • 1.1/2 tsp lemon juice
    • 1 lemon zest
    • 1/8 tsp salt
    • 1.1/2 tsp baking powder
    • 1 Tbsp poppy seeds
    Lemon Glaze
    • Juice of 1/2 a lemon + 2  Tbsp sugar - Mix well.
    Method
    1. Beat butter, sugar and eggs till well combined.
    2. Instead of sifting the flour, aerate the flour, salt and baking powder with a wire whisk till well incorporated.
    3. Pour the egg mixture into the flour mixture.  Add in the milk, lemon zest and juice.
    4. Mix till just moistened.
    5. Fill 3/4 of the muffin cup with the batter.
    6. Bake in a preheated oven @ 190 deg C for 20 mins., till golden  brown.  Test with a skewer till it comes out clean.
    7. Prick holes on the muffins and drizzle on the lemon glaze once they are out of the oven.
    8. Serve muffins warm
    9. Yield :  5 muffins 

Here's wishing all of you 

A Very Merry X'mas and A Happy New Year

Will be taking a short break during this festive season, see you folks in 2013!


Savoury Tong Yuen for Dongzhi aka Winter Solstice Festival

0 komentar


I fast forwarded Dongzhi aka Winter Solstice and celebrated it early.  Made these Savoury Tong Yuen or glutinous rice balls  and had this for lunch with my family.  Normally, I would make sweet tong yuen but this year I thought I'd try something different which will double up as a meal as well instead of having it just for dessert.  Dongzhi falls on this Friday, 21st December 2012.


Recipe for Savoury Tang Yuen

For the ingredients and method of  making Tong Yuen, please click 'here'.

    Ingredients   
    • 150 gm pork or chicken fillet
    • 4 dried Shitake mushrooms, soaked, stemmed and sliced
    • Chicken stock
    • Vegetables of your choice
    • Seasalt to taste
    • Sesame oil
    Seasoning for meat
    • 1 tsp light soya sauce, 1/2  tsp seasalt, 1/4 tsp sugar, a dash of  pepper
    Method
    1.  Bring the chicken stock to a boil, add in the mushrooms and marinated meat, simmer on low heat till cooked.
    2.  Fine tune to desired taste and add in the vegetables.
    3.  Ladle the boiled tong yuen onto serving bowls, top up with the chicken broth, drizzle on some sesame oil and a dash of pepper.
    4.  Serve immediately.
     
     Happy Dongzhi ~ Winter Solstice 
    to those who celebrate this festival on Friday 21st December 2012
     

Steamed Fish in Garlic Lime Sauce

0 komentar


I got the idea of steaming this fish from my daughter.  She tasted this dish recently and gave the thumbs up.  She suggested that I try to replicate this and gave me a rough idea of the ingredients.  I just concocted the sauce with whatever ingredients  I had on hand and came up with this. True to what she said,  this fish was delicious, a wee bit sweet, tangy but just refreshing!  Thanks, dear!


Recipe for Steamed Fish in Garlic Lime Sauce

    Ingredients
    • 400 gm Siakap fish or Tilapia
    • 2 chilli padi/bird eye chillies, chopped
    • 1 stalk lemon grass, only the white part, chopped finely
    • 12 cloves garlic, chopped
    • 1.1/2 Tbsp pomfret fish sauce (nampla)
    • 3  Tbsp calamansi juice
    • 2  tsp sugar
    • Seasalt to rub onto the fish, inside out
    • Sesame oil to drizzle
    Method
    1. Clean and make 2 diagonal cuts on the fish.  Rub in some seasalt, inside out.  Set aside.
    2. Mix all the ingredients in a bowl, fine tune to taste.
    3. Place 2 tsp of the sauce on the plate, place the fish on top of it, and put 1.1/2 tsp of sauce inside the fish belly.
    4. Pour the rest of the sauce on top of the fish.
    5. Steam on rapidly boiling water for 8 to 10 mins. depending on the size of the fish.
    6. Test and see if the meat by the bone is white - the fish is done.
    7. Drizzle on some sesame oil and garnish with Chinese parsley.
    8. Serve immediately. 


Walnut Tart

0 komentar


Walnut Tart ~ My first attempt at making tarts.  I  googled for an easy crust recipe to make the tart shell and after watching a video from Joyofbaking.com., set out to experiment.  I was overjoyed when the tarts came out well but on scrutinising them further, found that the edges were  thick.  Nonetheless,  the tarts were yum and my family loved it!


See the thick edges .... never mind more crust to munch on!   Will definitely try to improve.


Recipe for Walnut Tart  ( Sweet crust pastry adapted from Joy of Baking.com)

    Ingredients for Sweet Crust Pastry 
    • 210 gm plain flour 
    • 1/8 tsp salt
    • 113 gm butter/margarine
    • 50 gm sugar
    • 1 egg
    • Egg white to seal the crust
     Method
    1. Whisk the plain flour and salt, set aside.
    2.  Beat the butter till softened, add in sugar and beat till light and fluffy.
    3. Gradually add in the egg, beating just till incorporated.
    4. Add flour mixture all at once and mix just until it forms a ball of dough.
    5. Flatten dough into a disk, cover with plastic wrap and refrigerate for 20 mins. or till just firm or place in the freezer for about 15 mins.
    6. Lightly grease an 8 to 9 inch (23 cm) tart pan with a removable base.
    7. Once the pastry has chilled sufficiently, evenly pat onto the bottom and up the sides of the tart pan.
    8. Cover with plastic wrap and place in the freezer for about 15 mins.
    9. Lightly prick the bottom of the pastry crust with a fork (this will prevent the dough from puffing up as it bakes).
    10. Place tart pan on a baking sheet and bake crust for 5 mins.in a preheated oven @ 205 deg.C.  Reduce  temperatue to 180 deg.C and continue to bake for about 15 mins, till crust is dry and lightly golden brown.
    11. Remove from oven and place on a wire rack to cool.
    Egg white glaze
    1. Let the crust cool for  3 to 5 mins.  Lightly  brush the bottom and sides of the warm pastry crust with some lightly beaten egg.  (This helps to prevent the filling from softening the crust).
    Ingredients for Filling  
    • 1/2 egg lightly beaten
    • 1.1/2 oz brown sugar
    • a pinch of salt
    • 1 Tbsp melted butter
    • 1 Tbsp golden syrup or honey
    • 60 gm walnuts, coarsely chopped
    • 1 Tbsp Rum or Brandy
    Method
    1. Beat the egg, brown sugar, salt till light and ribbony.  Add in melted butter, golden syrup and liquor.
    2. Pour sugar mixture into tart shells, sprinkle on the chopped walnuts.
    3. Bake in a preheated oven @ 180 deg C for about 25 mins. till the filling has puffed but is still wobbly when gently shaken.  Test with a skewer at the sides till it comes out  clean.
    4. Cool for @ least an hour before cutting into wedges.
    5. Serve on its own or with ice cream.
    6. Yield :  Two 4.5 inch  tarts
Note :  Double the recipe of the filling for an 8 to 9 inch tart pan


      I'm submitting this post to Recipe Box # 26 hosted by Bizzy Bakes


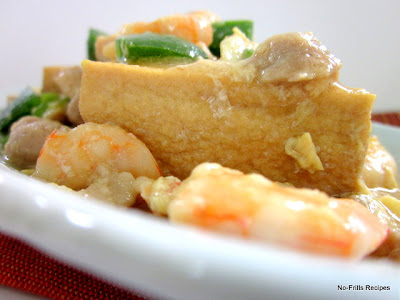
    Braised Beancurd ~ Tofu

    0 komentar


    Beancurd on its own is rather bland in taste but with 'add ons', it can be transformed into a delicious dish.  I cook this quite often and it does go well with a bowl of fluffy white rice.


    Recipe for Braised Beancurd ~ Tofu

      Ingredients
      • 4 pieces of  fried beancurd/tofu
      • 100 gm pork fillet, diced
      • 100 gm prawns, diced
      • 1 capsicum diced
      • 2 pips of garlic, chopped
      • 1 egg, lightly beaten
      • 1.1/2 tsp cornflour + 1.1/2 Tbsp water to thicken
      • Sesame oil to drizzle 
      Seasoning for pork and prawns
      • 1/2 tsp each of seasalt, light soya sauce
      • 1/4 tsp of dark soya sauce, sugar and cornflour (for pork only)
      • Dash of pepper
       Method
      1. Season the  pork fillet and prawns with the above seasoning for about half an hour.
      2. Saute the chopped garlic with some oil in a wok, add in the pork fillet, stir fry, add in 1/2 cup water.
      3. Once cooked, add in the beancurd, followed by the prawns and capsicum.
      4. Test for taste, add in the cornflour mixture and beaten egg.  Stir to mix, test for taste, turn off heat.
      5. Drizzle on some sesame oil
      6. Dish out and serve with hot rice.
       

    Apricot & Sultana Fruit Cake

    0 komentar


    It's the month of December and as X'mas is not too far away, I made this Apricot & Sultana Fruit Cake which can be made early  and giveaway as a gift to relatives and friends during this festive season.  This cake keeps well and yummy with a cuppa of plain hot tea for breakfast, tea party or snack.


    Recipe for Apricot and Sultana Fruit Cake

      Ingredients
      • 13.1/2 oz dried apricot, chopped
      • 9 oz sultanas, chopped
      • 8  Tbsp orange Cointreau
      • 12 oz butter/margarine
      • 5 oz vanilla/caster sugar
      • Zest of 3 oranges
      • Zest of 1.1/2 lemon
      • 6 eggs
      • 6 oz plain flour
      • 3/4 tsp baking powder
      • 6.3/4 oz almond meal
      Method
      1. Combine chopped apricots and sultanas with Cointreau in a bowl and set aside.  You can keep this in the fridge, covered, overnight.
      2. Sift flour with the baking powder, set aside.
      3. Cream butter, sugar, zest till light, creamy and thick.  Add in the eggs one @ a time, mix well after each addition.
      4. Fold sifted flour into the creamed mixture.
      5. Add in the apricot and sultanas mixture in 3 batches, mix well.
      6. Fold in the almond meal in 3 batches, mix well, scraping from the bottom and sides of the mixing bowl.
      7. Spoon cake batter into a lightly greased and paper lined 8 inch round  spring-form cake pan.
      8. Level the surface and make a slight depression in the center, drop the pan on the worktop from a height of  2 inches.
      9. Bake in a preheated oven @ 160 deg C for 40 to 50 mins. till golden brown.  Test with a skewer till it comes out clean.
      10. Remove from oven, let cool in pan before unmoulding onto a wire rack to cool completely.
      11. Wrap up with foil and keep the cake, covered in the refrigerator.
      12. Yield :  Two -  8 inch  round cakes.


  • onde-onde © 2012 | Designed by Rumah Dijual, in collaboration with Web Hosting , Blogger Templates and WP Themes