Tampilkan postingan dengan label Desserts. Tampilkan semua postingan

Mango Sorbet 芒果沙冰

0 komentar


Sorbet is a refreshing dessert to cleanse your palate after a  meal.   I've made mine with some mangoes given by a friend from her orchard and it's fruity and fresh.  Yum is the word and it's perfect to snack on more so on a hot and humid day!


Recipe for Mango Sorbet  芒果沙冰 (adapted from 'here' with modification)
    Ingredients                               


    • 2 ripe mangoes, about 1 kg, peeled and pitted
    • 130 gm sugar
    • 160 ml water
    • Juice from 1 lime, about 4 tsp
    • 1 Tbsp Rum or more to taste
    • pinch of salt
    Method

    1. Cook the sugar and water till sugar has dissolved, let cool.
    2. Cut the mango into chunks, put them into a food processor.  Add in salt and lime juice and puree till smooth.
    3. Sieve the puree and discard any pulp.
    4. Mix in the sugar syrup, test for taste.
    5. Pour into a large bowl, cover with cling wrap and keep refrigerated overnight.
    6. Just before churning in the ice cream maker, add in the Rum, mix well.
    7. Churn the mixture according to  the instructions of your ice cream maker.  Transfer the mixture to a plastic container and freeze before serving.
    Note :

    As alcohol doesn't freeze, adding alcohol in a sorbet helps to prevent it from freezing solid but if adding too much, the sorbet won't freeze at all.


Durian Ice Popsicles 榴莲冰棒。

0 komentar


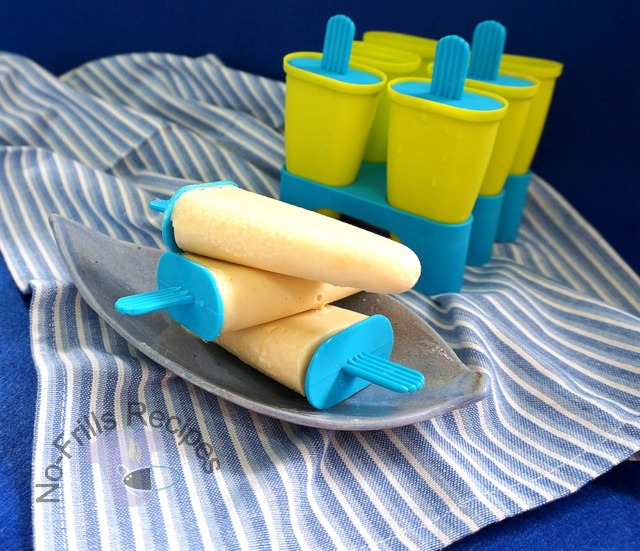
I've bought this set of ice popsicle moulds quite some time ago and had totally forgotten to put them to good use until lately.   We have had some durians for dessert and I used the leftover to make this yummy frozen popsicle.  Well, enjoying durians is a much acquired taste, it's either you like it or you don't.  Some people just adore the smelly fruit while others are simply repulsed by it!  Which category are you?


Recipe for Durian Ice Popsicles

Ingredients                                             


  • 250 gm durian flesh           
  • 5 Tbsp caster sugar
  • 250 ml full cream milk
  • a pinch of salt
Method    
  1. Put all the above ingredients into a blender and blend till thick and creamy.
  2. Pour the mixture into the ice popsicle moulds.
  3. Freeze till firm, preferably overnight.         


Puff Pastry Egg Tarts - 2 酥皮蛋撻

0 komentar


I took the opportunity to try my hands at making puff pastry from scratch when I was on vacation as the weather was quite cooling and I assumed that the dough wouldn't be sticky and messy to handle.
I could make both oil and water dough easily and there were no 'sweat and tears', LOL!  The pastries turned out nice and flaky and everybody gave their thumbs up for this dim sum, especially my dear grandnephew who asked for more!


Oil dough - Sieve the plain flour into a mixing bowl, add in the cold, cubed butter, mash with a fork and slowly combine to form a soft dough.  Wrap up with clingwrap and keep in the fridge for 30 mins.  (You can do this with a food processor if you wish),


Water dough - Sieve the plain flour into a mixing bowl, add in the slightly  beaten egg yolks, mix well, add ice cold water gradually,( you may not require the whole amount of water as too much water can make the pastry tough), mix well and form into a dough.  Wrap up with clingwrap and keep in the fridge for 30 mins.


After 30 mins., roll out the water dough, place the oil dough in the centre and wrap it up like in the above picture.  Wrap with clingwrap and keep in the fridge for 30 mins.


After 30 mins. roll out the dough and fold into three like in the above pictures.  Wrap with clingwrap and keep refridgerated for another 30 mins.

Repeat this step (3 layers) one more time.  Wrap up the dough and keep chilled for another 30 mins.


 After 30 mins., roll out the dough and this time fold into 4 layers, like in the pictures.  Wrap up and keep chilled for another 30 mins.  Roll out the dough, cut with a pastry cutter.  Lightly press the dough onto lightly greased tart moulds, prick some holes with a fork.  Keep these 'pressed tart moulds' in the fridge for about 20 mins.  Retrieve from fridge and pour in the egg custard, 3/4 full.

Bake on the lower shelf of a preheated oven @ 180 deg.C for 25 to 30 mins.  Let cool in the tart moulds before unmoulding.

(Please check  'here' for details in baking these egg tarts).


Recipe for Puff Pastry Egg Tarts

Ingredients for Oil Dough
  • 140 gm plain flour
  • 180 gm butter, cut into cubes and keep chilled
Water Dough
  • 140 gm plain flour
  • 40 gm/2 egg yolks, lightly beaten
  • 40 to 50 ml ice cold water
Egg Custard Filling
  • 100 ml water
  • 75 to 80 gm sugar
  • 2.1/2 eggs
  • 125 ml milk
  • 1/2 tsp vanilla
Method for Custard Filling
  1. Boil the water with sugar till sugar dissolves.  Let cool.
  2. Lightly whisk the eggs with the milk.  Do not whisk till frothy.  Add in the vanilla.  Mix well.
  3. Pour in the cooled syrup, mix well.
  4. Strain the egg mixture twice and pour into a jug for easy pouring into the tart moulds.
Yield :  12 pieces of 2.1/2 inch diameter and 9 pieces of 3 inch diameter.


Chia Seed Black Sesame Snowskin Mooncake ~ 2014

0 komentar


After my post on Black Sesame Ice Cream, here comes my Black Sesame Chia Seed Snowskin Mooncakes.  This is my first attempt using the KCT premix snowskin mooncake flour and the mooncakes turned out soft.  The dough being not oily was easy to handle as well.  These snowskin mooncakes stayed soft even after storing in the fridge for 4 days.


Made some multicoloured ones as well.  They do look cute and petite.


Recipe for Chia Seed Black Sesame Snowskin Mooncake (adapted from 'here')
    Ingredients                                                                  


    • 25 gm kao fun (cooked glutinous rice flour)
    • 115 gm KCT pinpe Premix Powder
    • 25 gm icing sugar
    • 23 gm shortening
    • 150 ml water boiled with pandan/screwpine leaves
    • 1.1/2 tsp Chia seeds (more if preferred)
    • 400 gm black sesame paste (store bought)
    • extra kao fun for dusting
    Method
    1. Combine kao fun and KCT premix in a medium bowl, mix well.
    2. In a pot, add 150 ml pandan water, icing sugar and shortening, boil till shortening has melted, stir well with a hand whisk.
    3. Pour the hot liquid into the flour, add in the Chia seeds and use a spatula to stir to a soft dough. Leave dough to cool and rest for about 15 to 20 mins.  Lightly knead dough to smooth, add in some kao fun if dough is sticky.
    4. Divide dough into 25 gm pieces, roll into a ball, flatten by hand or use a rolling pin, put a ball of filling and wrap up into a ball.  Filling is 30 gm per piece.
    5. Place ball of dough into the mould, press, and unmould.
    6. Keep snowskin mooncakes in the fridge, covered, in a container with a piece of paper towel on top to prevent condense water from dripping onto the mooncakes.  These mooncakes stayed soft even on the fourth day.
    7. Yield : 13 to 14 mooncakes depending on the size of the mould.


I'm linking this post to the Little Thumbs Up event and the theme for August is 'Flour'
jointly organised by
Zoe of  Bake for Happy Kids  and  Doreen of  My Little Favourite DIY
and hosted by
Diana of  Domestic Goddess Wannabe
and

I'm joining Best Recipes for Everyone August 2014 Event Theme :  Mooncake
hosted by  Fion of   XuanHom's Mom


Black Sesame Ice Cream

0 komentar


This is the cool gritty luscious dessert that I've always wanted to try.  I surfed the internet for an 'easy to follow' recipe and chanced upon this delectable dessert from 'justonecookbook'.   Mine didn't turn out as smooth as hers, maybe because I didn't grind the roasted black sesame seeds till very, very fine. Nonetheless, it was enjoyed by members of my family and they nodded with approval when I asked them whether it was good or otherwise.


Recipe for Black Sesame Ice Cream  (adapted from 'here')

    Ingredients

    • 2 Tbsp roasted black sesame seeds, roasted      
    • 400 ml milk
    • 70 gm sugar
    • 3 egg yolks
    • 2 Tbsp honey
    • 3 Tbsp black sesame paste (homemade)
    • 200 ml heavy cream
    • 1 tsp vanilla
    • a pinch of salt
    Method
    1. To make the black sesame paste.  Mix 3 Tbsp of  roasted and grounded black sesame seeds with 3 Tbsp of honey to form a paste.  Set aside.
    2. Pan fry the black sesame seeds over medium heat, stir till they start popping.  Cool and grind very finely.
    3. Bring the milk to a simmer, remove from heat.
    4. With a handheld whisk, whisk sugar, egg yolks till pale yellow.
    5. Add in honey, the grounded black sesame seeds, black sesame paste.
    6. Add the milk into the sesame mixture, slowly.
    7. Pour the mixture into a small pot, simmer under low heat.  Cook till custard thickens and can coat the back of the wooden spoon.
    8. Remove from heat and let cool, add vanilla.
    9. Whisk the cream and a pinch of salt till peaks form.
    10. Add the whipped cream into the cooled black sesame mixture.
    11. Fold in, don't overmix.  Chill in the fridge, covered in cling wrap, overnight.
    12. Process in the ice cream machine according to instructions.  Transfer to a container and freeze before serving.


Non-dairy Banana Ice Cream

0 komentar


This is a non-dairy ice cream which is absolutely easy to make with only three ingredients.  I like it that it's light and fat free, except for a bit of oil from the peanut butter and it's refreshing, just right for dessert after a hearty meal.


Recipe for Non-dairy Banana Ice Cream

    Ingredients

    • 420 gm/4 frozen ripe bananas (nett weight)
    • 2 Tbsp peanut butter
    • 3 Tbsp water to facilitate blending
    • a pinch of salt (optional)
    Method
    1. Cut the  bananas into 1/2 inch slices.  Place on a plate lined with a plastic sheet, uncovered, in the freezer, for 2 to 3 hours till hard.
    2. Blend or process in a food processor together with the peanut butter.  Add water to facilitate blending if necessary.
    3. Serve immediately or store in the freezer in a container for a firmer and scoopable ice cream.


Almond Filo Pastry

0 komentar


These crispy crisps are very suitable for snacking and can be addictive too.  It's simple and easy to prepare but you must work quickly when preparing this pastry as the Filo sheets dry up very quickly, more so in our hot weather.  These are light and refreshing and should they lose their crispiness later, just pop them into the oven toaster to reheat.


Recipe for Almond Filo Pastry

Ingredients
  • 5 sheets of Filo pastry
  • 1 egg white
  • 30 gm melted butter or oil (I used butter)
  • 40 gm sugar
  • 30 to 40 gm almond flakes
Method
  1. Place the Filo sheets on a board, cut into half.  (Cover the sheets with parchment paper and place a damp cloth on top to prevent the sheets from drying).
  2. Beat the egg white with a ball whisk till foamy and broken down, add in the melted butter, mix well.
  3. Place a sheet of pastry on the board, brush with the egg white butter mixture, sprinkle the sugar on top generously.
  4. Then place another sheet of pastry on top of the first and repeat the process till you have 5 sheets of pastry, all brushed with egg white mixture and sprinkled with sugar.
  5. Cut the sheets into equal sizes, about 1.1/2 inches x 2 inches, then sprinkle the almond flakes on top.
  6. Bake in a preheated oven @ 180 deg.C for 4 to 5 mins.till golden brown and crispy. Let cool on the pan before removing them onto a wire rack to cool completely.
  7. Store them in an airtight container.


    I'm linking this post to the Little Thumbs Up Event' and for June, the theme is 'Butter'
    organised by  Zoe  of  'Bake for Happy Kids',  Doreen of   'My Little Favourite DIY'  and hosted by

    Mint Cookies Ice Cream

    0 komentar


    This is a rich and indulgent ice cream comprising of vanilla and peppermint choc chip cookies which give the creamy dessert the added crunch.  Perfect as a treat or a snack, any time of the day!


    Recipe for Mint Cookies Ice Cream

      Ingredients
      • 1 cup heavy cream
      • 1 cup whole milk
      • 3 oz sugar
      • 3 egg yolks
      • 1/8 tsp salt
      • 1/2 tsp vanilla
      • 10 choc chip peppermint cookies, crushed.
      Method

      1. Bring heavy cream, milk and salt to a simmer, let cool.
      2. Whisk egg yolks with sugar together till pale.
      3. Add the milk mixture to the egg mixture, mix well.
      4. Then pour back the egg yolk milk mixture into the pot, stirring continously till mixture thickens and can coat the back of the wooden spoon.  Add in vanilla.
      5. Pour into a bowl and cover with cling wrap, let cool and keep refrigerated overnight.
      6. Process the mixture in the ice cream maker according to instructions.  Transfer 1/3 ice cream to a container, add in the crushed cookies, mix quickly and continue layering.  Store in freezer before serving.


      I'm linking this post to the Little Thumbs Up event, theme for this month, May is 'Milk', organised by
      and hosted by  Tze of  Awayofmind Bakery House

    Salted Caramel Ice Cream

    0 komentar


    This cool dessert should be most welcomed in any household during this hot, humid and hazy weather.  We are experiencing a very hot spell in this part of the world and this can be choking at times more so if people were to adopt 'open burning' in their compounds.   This salted caramel is a fun flavour to make and I like it best, topped with some caramel sauce and a dash of freshly ground seasalt.......an amazing flavour!

    Please note that my blog has 'moved house' and my new domain name is  www.nofrillsrecipes.com and I would appreciate that you update my home url at your site.  Thanks and do have a nice weekend ahead!


    Recipe for Salted Caramel Ice Cream  (Adapted from 'here' with slight modification)

      Ingredients
    • 100 gm caster sugar
    • 1/8 cup/31 ml water
    • 3/4 cup cream
    • 1/2 cup milk
    • 1/8 tsp seasalt or a bit less
    • 4 egg yolks
    • 3/4 tsp vanilla
    • lightly toasted almond nibs
    • extra caramel sauce
    • seasalt for garnishing
    Method
    1. Heat sugar and water till it turns just light brown.
    2. Add cream, milk to the pan and allow to heat through, stirring occasionally until it's just beginning to steam. Add and stir in seasalt till it dissolves.  Turn off heat and let cool.
    3. In another bowl whisk egg yolks and vanilla till smooth.  Gradually pour the caramel cream mixture into the egg yolks, whisking constantly.
    4. Pour the caramel-egg mixture back into the pot and cook till it coats the back of a wooden spoon.
    5. Put in a bowl, cover with cling wrap, let cool in room temperature before refridgerating overnight.
    6. Churn according to the manufacturer's instructions of your ice cream maker and add in the nibbed almonds just at the end of churning.


    Pistachio Ice Cream

    0 komentar


    This  nutty  Pistachio Ice Cream should be most welcome to round off a sumptuous reunion dinner on 30th January as the lunar Chinese New Year falls on 31st January this year.  This pale green and fragrant icy dessert is not too sweet and not overly rich as I've reduced the amount of cream in the recipe... so feel free to enjoy!


    Recipe for Pistachio Ice Cream (adapted from 'Here' with modification)

      Ingredients
      • 125 gm Pistachios
      • 60 gm caster sugar
      • 3 egg yolks
      • 250 ml cream
      • 250 ml milk
      • Pinch of salt
        Method
        1. Blend half the Pistachios till fine.  Roughly chop up the balance.
        2. Lightly boil the cream, milk, salt and finely ground Pistachios.  Remove from heat.
        3. Whisk the egg yolks with the sugar till thick and creamy.
        4. Pour the milk mixture onto the egg mixture, keep stirring to prevent the milk from cooking the egg mixture.
        5. Pour this mixture back to the saucepan and cook, stirring with a wooden spoon.  When the custard is done, it can coat the back of the wooden spoon.
        6. Pour this mixture into a bowl, cover with cling wrap and let cool.  Once cooled, keep refrigerated overnight.
        7. Churn the mixture according to the instructions of your Ice cream maker, about 30 mins. 
        8. Add in the roughly chopped Pistachios just before you switch off the Ice cream maker.


        This will be my last post before the Chinese New Year and I'll be taking a short break from blogging.
        Last but not least, I wish all my readers and friends 

         Happy Chinese New Year and Gong Xi Fa Cai!

       
    • onde-onde © 2012 | Designed by Rumah Dijual, in collaboration with Web Hosting , Blogger Templates and WP Themes