Chia Seed Black Sesame Snowskin Mooncake ~ 2014

0 komentar


After my post on Black Sesame Ice Cream, here comes my Black Sesame Chia Seed Snowskin Mooncakes.  This is my first attempt using the KCT premix snowskin mooncake flour and the mooncakes turned out soft.  The dough being not oily was easy to handle as well.  These snowskin mooncakes stayed soft even after storing in the fridge for 4 days.


Made some multicoloured ones as well.  They do look cute and petite.


Recipe for Chia Seed Black Sesame Snowskin Mooncake (adapted from 'here')
    Ingredients                                                                  


    • 25 gm kao fun (cooked glutinous rice flour)
    • 115 gm KCT pinpe Premix Powder
    • 25 gm icing sugar
    • 23 gm shortening
    • 150 ml water boiled with pandan/screwpine leaves
    • 1.1/2 tsp Chia seeds (more if preferred)
    • 400 gm black sesame paste (store bought)
    • extra kao fun for dusting
    Method
    1. Combine kao fun and KCT premix in a medium bowl, mix well.
    2. In a pot, add 150 ml pandan water, icing sugar and shortening, boil till shortening has melted, stir well with a hand whisk.
    3. Pour the hot liquid into the flour, add in the Chia seeds and use a spatula to stir to a soft dough. Leave dough to cool and rest for about 15 to 20 mins.  Lightly knead dough to smooth, add in some kao fun if dough is sticky.
    4. Divide dough into 25 gm pieces, roll into a ball, flatten by hand or use a rolling pin, put a ball of filling and wrap up into a ball.  Filling is 30 gm per piece.
    5. Place ball of dough into the mould, press, and unmould.
    6. Keep snowskin mooncakes in the fridge, covered, in a container with a piece of paper towel on top to prevent condense water from dripping onto the mooncakes.  These mooncakes stayed soft even on the fourth day.
    7. Yield : 13 to 14 mooncakes depending on the size of the mould.


I'm linking this post to the Little Thumbs Up event and the theme for August is 'Flour'
jointly organised by
Zoe of  Bake for Happy Kids  and  Doreen of  My Little Favourite DIY
and hosted by
Diana of  Domestic Goddess Wannabe
and

I'm joining Best Recipes for Everyone August 2014 Event Theme :  Mooncake
hosted by  Fion of   XuanHom's Mom


Black Sesame Ice Cream

0 komentar


This is the cool gritty luscious dessert that I've always wanted to try.  I surfed the internet for an 'easy to follow' recipe and chanced upon this delectable dessert from 'justonecookbook'.   Mine didn't turn out as smooth as hers, maybe because I didn't grind the roasted black sesame seeds till very, very fine. Nonetheless, it was enjoyed by members of my family and they nodded with approval when I asked them whether it was good or otherwise.


Recipe for Black Sesame Ice Cream  (adapted from 'here')

    Ingredients

    • 2 Tbsp roasted black sesame seeds, roasted      
    • 400 ml milk
    • 70 gm sugar
    • 3 egg yolks
    • 2 Tbsp honey
    • 3 Tbsp black sesame paste (homemade)
    • 200 ml heavy cream
    • 1 tsp vanilla
    • a pinch of salt
    Method
    1. To make the black sesame paste.  Mix 3 Tbsp of  roasted and grounded black sesame seeds with 3 Tbsp of honey to form a paste.  Set aside.
    2. Pan fry the black sesame seeds over medium heat, stir till they start popping.  Cool and grind very finely.
    3. Bring the milk to a simmer, remove from heat.
    4. With a handheld whisk, whisk sugar, egg yolks till pale yellow.
    5. Add in honey, the grounded black sesame seeds, black sesame paste.
    6. Add the milk into the sesame mixture, slowly.
    7. Pour the mixture into a small pot, simmer under low heat.  Cook till custard thickens and can coat the back of the wooden spoon.
    8. Remove from heat and let cool, add vanilla.
    9. Whisk the cream and a pinch of salt till peaks form.
    10. Add the whipped cream into the cooled black sesame mixture.
    11. Fold in, don't overmix.  Chill in the fridge, covered in cling wrap, overnight.
    12. Process in the ice cream machine according to instructions.  Transfer to a container and freeze before serving.


Angel Fish Koong Chai Paeng - 香化 公仔饼 ~ Mooncake Festival 2014

0 komentar


When I was a kid, I'd look forward to the Mid-Autumn Lantern festival, not so much for mooncakes but the little piglets encased in red baskets which were given free with any purchase of mooncakes.  I remember them to be just plain dough with no fillings but I enjoyed them.  I was glad that Joceline shared her recipe in her blog and subsequently many fellow bloggers have tried her recipe.  I only made half her recipe and my mould being quite big but shallow, I managed to get 10 Angel fish koong chai paeng.


Recipe for Angel Fish Koong Chai Paeng  (adapted from 'here')

Ingredients

  • 175 gm plain flour
  • 115 ml golden syrup
  • 50 ml peanut oil
  • 2.1/2 ml alkaline water
  • 75 gm lotus paste
  • 1 egg + 1 tsp water, lightly beaten and strained
  • Some red beans as eyes for the fish
Method
  1. Sift the flour, set aside.
  2. Mix golden syrup, oil, alkaline water and lotus paste with a ball whisk till well combined.
  3. Add in sifted flour, mix to form a dough.
  4. Cover and let it rest for 2 to 3 hrs. till the dough doesn't stick to the hand.  (I rested mine for 4 hours).
  5. Transfer dough to a lightly floured surface, knead lightly.
  6. Divide dough into 60 gm each.  Roll dough into a ball.
  7. Lightly dust the mould with some flour, press the ball of dough into the mould and gently knock it out. Press a red bean as an eye for the fish.
  8. Bake in a preheated oven @160 deg.C for 10 to 12 mins.
  9. Remove from oven and let cool for about 15 mins.
  10. Apply egg wash on the body of the fish except the eye.
  11. Bake for another 15 to 20 mins.
  12. Ligthly apply egg wash on the eye of the fish.
  13. Yield :  10 koong chai paeng.


I'm linking this post to the Little Thumbs Up event and the theme for August is 'Flour'
jointly organised by
and hosted by
Diana of  Domestic Goddess Wannabe
and

I'm joining Best Recipes for Everyone August 2014 Event Theme :  Mooncake
hosted by  Fion  XuanHom's Mom


Chelsea Buns

0 komentar


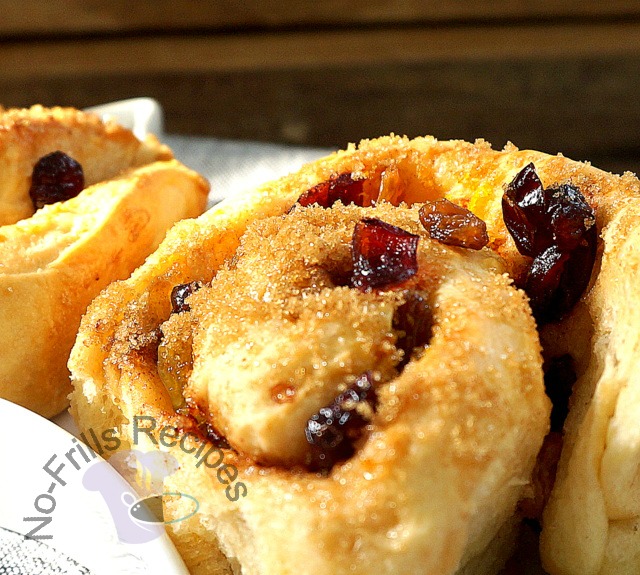
These raisin filled Chelsea Buns are a perfect accompaniment to a cup of hot coffee or tea.  They're not very sweet as I've omitted the glaze for the topping, instead I just sprinkled some brown sugar on top just prior to baking.  If you prefer a richer Chelsea Bun, you can add on a smear of butter for a more creamy taste :)


Recipe for Chelsea Buns (adapted from 'here')

    Ingredients

    • 500 gm high protein/bread flour
    • 1 tsp salt
    • 2 tsp dried yeast
    • 300 ml milk
    • 40 gm unsalted butter
    • 1 egg
    • brown sugar for sprinkling
    Filling
    • 25 gm butter, melted
    • 1 orange zest
    • 75 gm Demarara sugar
    • 2 tsp cinnamon
    • 100 gm raisins
    • 100 gm craisins
    Glaze  (I omitted)
    • 1.1/2 Tbsp honey
    • 1 Tbsp water     

    Method
    1. Melt butter in a small saucepan, add in milk, stir.  Heat till lukewarm.
    2. Sift flour, salt into a large mixing bowl, mix well.  Make a well in the centre and add in the yeast.
    3. Lightly beat up the egg.
    4. Pour milk-butter mixture and egg mixture into the flour.
    5. Mix flour until dough begins to come together and comes away from the sides of the bowl.
    6. Knead on a floured surface for about 5 mins. till dough is smooth and elastic.
    7. Place dough back into the mixing bowl, cover with a damp cloth and  let rise till double in size in a warm place for about 1 hour.
    8. Knock down dough, roll into a 10 x 11 inch rectangle.  Brush surface with some melted butter, sprinkle Demarara sugar, cinnamon, dried fruits and orange zest.
    9. Roll long side up like a swiss roll.
    10. Cut into about 1.3/4 inch thick.  Arrange rolls, cut side down onto a lightly greased baking pan.
    11. Cover with a damp cloth, let rise in a warm place for about 30 min.
    12. Sprinkle on some brown sugar.
    13. Bake in a preheated oven @ 190 deg.C for about 20 to 25 mins till golden brown.  Test with a skewer till it comes out clean, give it a knock and if the sound is hollow, then the buns are done.
    14. Yield :  12 buns


    I'm linking this post to the Little Thumbs Up event and theme for August is 'Flour',
    jointly organised by
    Zoe of  Bake for Happy Kids  and  Doreen of  My Little Favourite DIY
    and hosted by

Heong Fah Piggy Mooncakes - 香化猪仔饼 ~ 2014

0 komentar


These little piggies ......... don't you find these little piggies cute?   The pig is considered as a symbol of wealth and prosperity and I'm sure that children will be thrilled to receive these cute little piggies during the coming Mooncake or Mid-Autumn lantern festival.  I didn't have the heart to 'slaughter' these piggies for a picture to expose the 'innards'..... cashew nuts which I had added to give an extra crunch.


The inquisitive one .....

Recipe for Heong Fah Piggy Mooncakes

Ingredients
  • 200 gm superfine flour 
  • 180 gm lotus paste (softened at room temperature)
  • 130 ml golden syrup
  • 50 ml vegetable oil
  • 1 tsp alkaline water
  • 15 gm melon seeds lightly toasted (I used lightly toasted cashew nuts)
  • Black beans for eyes (rinse and pat dry)
  • Egg wash - 1 egg + 1 tsp water, mix and strain
Method
  1. Mix golden syurp, oil and alkaline water thoroughly.  Leave to rest for 2 hours.
  2. Sift in flour, mix well.
  3. Add in lotus paste, mix well.  Leave to rest for another 2 hours.
  4. Divide dough into 8 pieces of  80 gm each, roll into balls.  Leave some balance dough to make nose, ears and tails.  (You may need to add in more flour if the dough is too soft to handle).
  5. Take a ball of dough, put 2 cashew nuts in the centre, roll up and shape into a short cylinder.
  6. Squeeze the front part of the dough to form the neck of the piggy.  Pinch a small portion of dough to form the nose.  Poke holes with a skewer to form the nostrils.  Pinch some dough to form the ears, make a 'V' impression with the skewer.  Put black beans below the ears to form eyes.  Make an impression with the skewer to form the legs on both sides of the body.  Turn piggy round to the back, use skewer to make an impression at the bottom to form butt.  Take a bit of dough, roll it slightly to form the tail and stick it at the 'buttocks'.
  7. Bake in a preheated oven, middle shelf @ 170 deg.C for 20 mins.  Remove from oven and let cool for 15 mins.
  8. Apply egg wash all over the piggy, except the eyes.
  9. Return to the oven on the lower shelf, @ 160 deg.C, bake for 5 mins.
  10. Remove from oven and apply egg wash to the eyes, let cool.  Let the piggies rest for 2 to 3 days before consuming.
  11. Yield :  8 piggies


I'm linking this post to the Little Thumbs Up event and the theme for August is 'Flour'
jointly organised by
and hosted by
Diana of  Domestic Goddess Wannabe

and

I'm joining Best Recipes for Everyone August 2014 Event Theme :  Mooncake
hosted by  Fion  XuanHom's Mom


Mixed Nuts and Meat Floss Mooncakes ~ 2014

0 komentar


It is this time of the year again that we're beginning to see a lot of stalls being set up in the shopping malls selling a great variety of Mooncakes for the Mid-Autum Mooncake Festival which will fall on Monday, 8th of September.  I notice that the varieties of mooncakes seem to increase from year to year and some flavours can be very extraordinary.
I'm quite conservative and prefer to stick to the traditional flavours but may venture to add or substitute some of the ingredients to create a new twist to the flavour..... hence, my Mixed Nuts and Meat Floss Mooncakes.
The meat floss is hardly visible in the pictures but it does enhance the flavour of these nutty Mooncakes.


Recipe for Mixed Nuts and Meat Floss Mooncakes

    Ingredients

    • 60 gm walnuts, toasted and chopped
    • 60 gm almonds, toasted and chopped
    • 20 gm pumpkin kernels, toasted
    • 10 gm melon seeds, toasted
    • 75 gm kat paeng, chopped
    • 140 gm tong toong kua (candied melon)
    • 65 gm sesame seeds, toasted
    • 30 gm meat floss (chicken or pork)
    • 40 gm caster sugar
    • 4.1/2 Tbsp vegetable oil
    • 4.1/2 Tbsp water
    • 1.1/2  Tbsp rose concentrate
    • 3/4 Tbsp golden syrup
    • 1/4 tsp salt
    • 6 kaffir leaves, shredded and fried (optional)
    • 120 gm koh fun (cooked glutinous rice flour)
    • 3 Tbsp Brandy (optional)
    Method
    1. Mix the above items except for the last two ingredients.  Let rest for 30 mins.or more. 
    2. Mix in the koh fun and Brandy.  Roll out into balls of about 130 gm portions.
    Ingredients for Skin Dough
    • 150 gm superfine flour (may need to add more if too soft to handle)
    • 90 ml golden syrup
    • 38 ml vegetable oil
    • 2 ml alkaline water
    • Egg wash - 1 whole egg + 1 tsp water, mix and strain
    Method
    1. Mix syrup, oil and alkaline water thoroughly till no oil surface.  Use a ball whisk.
    2. Sift in flour, mix well with spatula and let rest for 2 hours or more.
    3. Knead lightly on floured surface.
    4. Dough skin is 50 to 55 gm
    5. Filling is 130 to 150 gm
    To assemble the mooncakes and bake them, please check it out  'here'


    I'm linking this post to the Little Thumbs Up event and the them for the month of August, is Flour
    jointly organised by
    Zoe of  Bake for Happy Kids and  Doreen of  My Little Favourite DIY
    and hosted by

Mandarin Orange and Pear Muffins

0 komentar


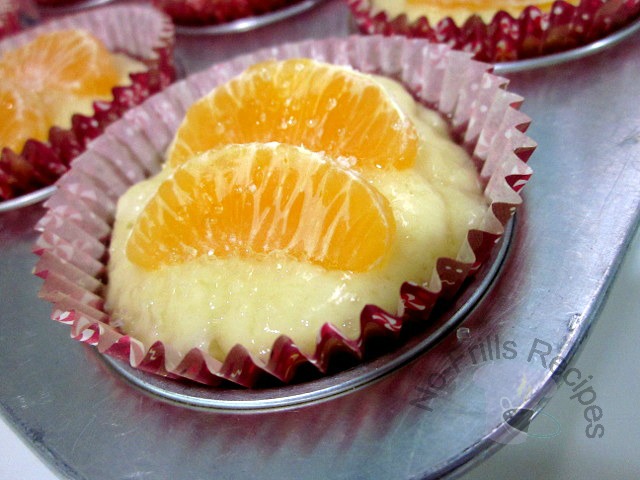
These muffins are light and refreshing, thanks to the bold orange flavour and a sweet topping.  I topped the muffins with two pieces of  Mandarin orange and added a sprinkling of sugar to give them a crusty top.  The pears added a fruity flavour and provided a moist texture to the muffins as well.


Recipe for Pear and Mandarin Orange Muffins

Ingredients   
  • 9 oz plain flour
  • 4 oz caster sugar 
  • 2 eggs
  • 1/2 cup melted butter or Canola oil (I used melted butter)
  • 125 to 150 ml plain yoghurt
  • 1 tsp vanilla
  • 3/4 cup chopped pears
  • 1 tsp baking powder
  • 1/2 tsp bicarbonate of soda
  • a pinch of salt
  • Mandarin orange
  • Sugar for sprinkling

    Method
    1. Sift flour, baking powder, bicarbonate of soda and salt into a mixing bowl.  Add in the sugar and mix well.
    2. Lightly whisk the eggs, oil, yoghurt and vanilla and mix thoroughly.
    3. Pour the wet ingredients into the flour mixture, toss in the chopped pears, mix till just combined.
    4. Scoop the batter into the muffin pan.  Arrange 2 pieces of Mandarin orange on the surface and add a sprinkling of sugar.
    5. Bake in a preheated oven @ 200 deg.C for 20 to 25 mins.  Test with a skewer till it comes out clean.
    6. Let muffins cool in pan and serve warm.
    7. Yield : 12 Muffins


    I'm linking this post to the 'Little Thumbs Up' event and the theme for August is 'Flour'
    organised by
    Zoe of  'Bake for Happy Kids', Doreen of  'My Little Favourite DIY' and hosted by
    Diana Gale of   'Domestic Goddess Wannabe'

     
  • onde-onde © 2012 | Designed by Rumah Dijual, in collaboration with Web Hosting , Blogger Templates and WP Themes