White Choc Chip Cookies

0 komentar


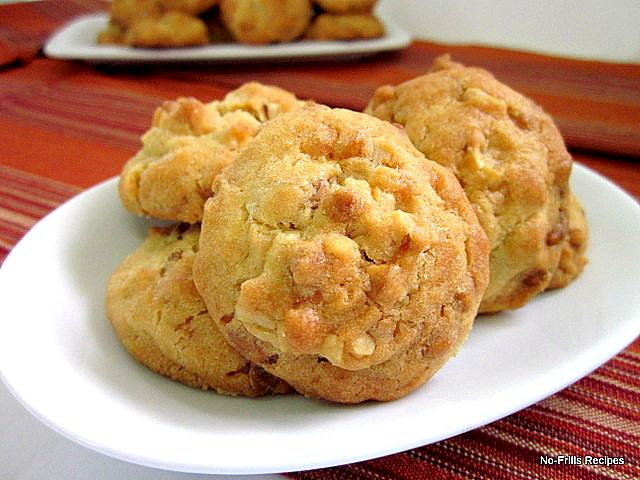
I was browsing through a cook book  and spotted this cookie recipe using white choc chips.  As I've hardly baked with white choc chips before, I was very eager to try out this recipe.  These cookies are crunchy, from the walnuts and I notice that they taste a bit milky too, a contribution from the white choc chips, I presume.


Recipe for White Choc Chip Cookies  (adapted from 'Baking-200 Moreish & Comforting Recipes with modifications re the method)
    Ingredients
    • 250 gm plain flour
    • 1.1/2  tsp baking powder
    • 125 gm salted butter
    • 100 gm light brown sugar  (reduced from 150 gm)
    • 60 ml vegetable oil
    • 1 egg
    • 1/2 tsp vanilla
    • 130 gm white choc chips  (reduced from 180 gm)
    • 70 gm chopped walnuts, lightly toasted  (reduced from 120 gm)
    Method
    1. Sift flour with baking powder, set aside.
    2. Beat butter, oil and brown sugar till light and creamy.
    3. Add the egg and vanilla beating till just blended.
    4. Fold in flour mixture, choc chips and nuts.
    5. Chill the dough in the fridge for about an hour.
    6. Drop rounded teaspoons onto a paperlined baking tray.
    7. Bake in a preheated oven @ 190 deg.C for about 8 to 10 mins. till the edges are just golden brown or a bit longer if you want a more crunchy cookie.
    8. Let cool in tray before transferring them onto a wire rack to cool completely.
    9. Store cookies in a cookie jar.
    10. Yield :  20 to 25 cookies depending on size.


    I'm linking this post to Aspiring Bakers #36: Choc-a-cookie (October 2013)

    and also to

    Cook-Your-Books #5 hosted by Kitchen Flavours

     photo 77951578-1914-4b72-8eda-9e40a91183ac_zps331eb4b4.jpg

Whisky Tour ~ Inverness

0 komentar


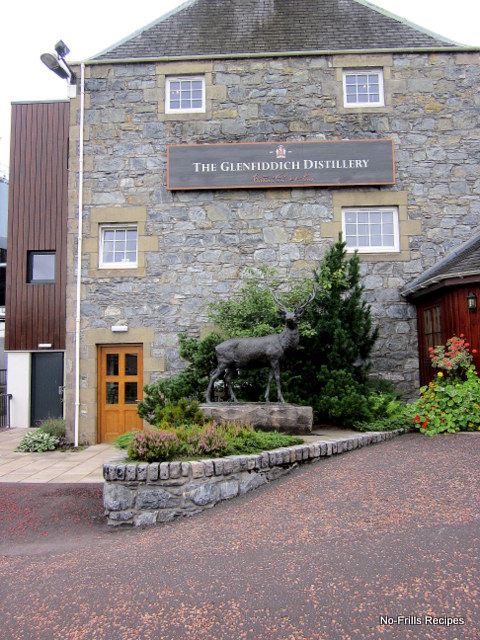
We started to explore west Scotland famous for its breath-taking scenery and on our way stopped by Dufftown to visit the Glenfiddich distillery, to see how Scottish malt whisky is being made.
 

The Glenfiddich Distillery is a Speyside single malt Scotch whisky distillery owned by William Grant & Sons.
Glenfiddich means "Valley of the Deer' in Gaelic, hence the presence of a stag symbol on Glenfiddich bottles.


We had a great tour of the working distillery and barrel warehouse and the tour guide was very informative and professional.


It's a free tour and at the end of it, you get to sample Glenfiddich 10, 12 and 18 years, on the house and can even ask for seconds ......... Cheers!


Glenfiddich 30 years
&
Glenfiddich 50 years and the price is a whopping 15,000 sterling pounds!!!


We had lunch at The Malt Barn restaurant on the right.

 Cream of Tomato and Basil
&
Bacon and Brie Bagel

 Salmon Tart
&
Cullen Skink, a traditional hearty Scottish soup made with
smoked haddock, potatoes and onions
 
Roasted Pork Belly
&
Traditional Fish Pie


 Rounded off with Dessert  :  Victoria Sponge Cake
&
Sticky Toffee Pudding


After a hearty meal, we continued on our journey to Loch Ness.  Who knows, we may be lucky enough to catch a glimpse of Nessie, the Loch Ness monster.  Stay tuned for more pictures in my future posts .......


Aberdeen and a Meet-up

0 komentar


Aberdeen, the third most populous city in Scotland boasts of its stately and serene architecture of many gray granite buildings, hence dubbed the 'Granite City'.  Most of the buildings were built from gray granite excavated from the Rubislaw Quarry which closed in 1971. Aberdeen is an expensive city, also known as the Oil Capital of Europe, fuelled by the North Sea petroleum industry.  This was where I spent my short vacation with my family recently.


I'm sure many of you would have heard of  Mary Moh, author of  Keep Learning Keep Smiling,  the Badminton enthusiast  and just recently her team emerged the champion  at the Corporate Decathlon Badminton Competition. Congrats, Mary!  At the mention of Badminton I could see the gleam in Mary's eyes!  I was very glad to meet up with her again.  I first met up with her around August  2010 in London.  This time as I was in her 'home city', she was so kind to invite me and my family to her house for dinner, in fact, we had two dinners.


A picture for rememberance before we dig into the  FOOD .... Mary and her hubby Steven with my  family.

From the pictures that you're going to see below, you have to agree with me that Mary is certainly a superb cook and she cooked, baked all these single handedly.... really put me to shame as I know that I will never, ever be able to cook up such a scrumptuous spread, all by myself!  She didn't have much time to prepare this meal for us as she was only back in Aberdeen late the night before and I was certainly amazed at her speed in preparing so many dishes for us.  One most befitting word to describe Mary .'Superwoman'!


Ok, let me introduce you to the menu .... from left, mixed vegetables, then pancakes, cucumber and sauce to go with the Peking Chicken, the foil wrapped pulut panggang, (spicy, sambal glutinous rice roll), mixed seafood and her signature dish, pork belly stew.  Imagine having home made pulut panggang in Aberdeen!   We liked the pork belly stew, very tasty and the pork was tender.  The pulut panggang was absolutely marvellous and my children enjoyed it very much too.


Have you had this before?  Peking Chicken with pancakes and sauce, all homemade!  Absolutely delicious!  I wouldn't dream of making this dish.


See the dessert spread ...... fresh grapes and strawberries, red bean paste Mochi and yummy chocolate Brownies, homemade!  We ate our fill and Mary separately  packed the Brownies for us so that we can snack on them while travelling the next day..... so thoughtful of her!


This was the second dinner we had in Mary's house before we left for home the next day.  Vegetarian 'chai kuih' and Sweet & Sour Pork.


Salted vegetable with pork belly and Salmon in Tomato ketchup sauce.


Hot and Spicy chicken (finger licking good)  and Mixed vegetables.


Dessert ..... watermelon and sweet potato angku kuih.   The angku kuih was very, very soft and yummy! She packed some for us to take home for breakfast the next day.

Mary and her hubby, Steven are such accommodating hosts and we enjoyed their company very much.  We chatted as if we've known each other for umpteen years and my children felt very comfortable with them too.
No one will believe that we met on the internet and through blogging.  I've never regretted starting my blog for I've made many friends and learnt a lot from sharing with my blogger friends.

So much for now and if you'd like to see more pictures of Scotland, stay tuned!  Cheers :)


Spicy Chicken with Korean sauce

0 komentar


I had a look at the Korean sauces that were sitting idle in the fridge and thought what would be the outcome if I mixed them up.  I had to experiment to find out.  So, I got hold of some chicken leg, debone them, mixed in some sauces and cooked up this dish.  Family members said that they tasted somewhat like satay chicken but nodded in agreement that they were delicious :)


Recipe for Spicy Chicken with Korean sauce

Ingredients                                                                 

  • 3 chicken leg, deboned       
  • 4 pips of garlic, minced
  • 1  tsp sugar
  • 1/2  tsp salt
  • 1/2  tsp light soya sauce
  • 1/2  Tbsp honey
  • 1  Tbsp  Bulgogi sauce
  • 1.1/2  Tbsp Sunchang Ssamjang (seasoned bean paste)
  • 2.1/2  tsp lightly toasted sesame seeds
  • Sesame oil                                    
Method
  1. Cut each of the deboned chicken leg into 2 pieces.
  2. Mix in the minced garlic, sugar, salt, light soya sauce, honey, Bulgogi and Sunchang Ssamjang sauces.  Marinate for a few hours or overnight, refrigerated.
  3. Heat up a tablespoon oil in a non-stick pan, add in the chicken pieces and set aside the marinade.
  4. Pan-fry the chicken, flipping from side to side, cook till through.
  5. Take out the chicken, leave the marinade in the pan and add in the uncooked marinade.  Mix well and fine tune to taste.
  6. Return the chicken to the pan, mix in the sesame seeds and drizzle on some sesame oil.
  7. Dish out and serve with rice.


I'm linking this post to the Little Thumbs Up 'Soy Bean' event organised by Doreen from my little favourite DIY and Zoe of  Bake for Happy Kids, hosted by  Mich of  Piece of Cake.

Kahlua Coffee Ice Cream

0 komentar


An easy and great flavour cool dessert to round up after a meal.  I added in some hazelnut milk chocolate for the extra crunch and a pinch of salt as I like a salty/sweet taste.


Recipe for Kahlua Coffee Ice Cream

    Ingredients
    • 1 cup milk
    • 1 cup whipping cream
    • 2 oz sugar
    • 4  Tbsp instant coffee powder (used Nescafe)
    • a pinch of salt
    • 2 oz sugar
    • 5 egg yolks
    • 2  Tbsp Kahlua
    • 2  tsp vanilla
    • 100 gm Hazelnut milk chocolate, chopped (optional)
    Method
    1. In a saucepan, mix the milk, cream, sugar and coffee powder and cook under low heat.  Keep stirring till sugar has dissolved and small bubbles appear.  Set aside.
    2. Whisk the egg yolks with sugar till light, pale and creamy.
    3. Gradually pour the coffee mixture into the egg mixture, keep stirring not to overcook the eggs. Mix well.
    4. Pour this mixture back into the saucepan and cook, under low heat, keep stirring with a wooden spoon.  Cook till the custard can coat the back of the wooden spoon.  Draw a line at the back of the wooden spoon and if the line stays, then the custard is done.  Remove from heat.
    5. Mix in the Kahlua and vanilla.
    6. Pour this mixture into a large bowl, cover with cling wrap.  Let cool to room temperature before refrigerating overnight.
    7. Churn the mixture in an ice-cream maker according to manufacturer's directions.  At the end of churning, mix in the chopped chocolate and pour the ice cream into a tub to freeze.


Braised Pork Ribs with Yam & Wood ear fungus

0 komentar


I bought this yam/taro from a wet market and the lady assured me that her yams are creamy when cooked.  She cut off a very small piece to justify her statement and true enough I saw some powdery substance on the knife.  It can be very frustrating when you end up getting a yam that's firm even when cooked for yams have a hardy taste with a minimal amount of sweetness.  But if you pair it up with some meat and fermented bean curd, the dish will be transformed into a tasty delicacy.


Recipe for Braised Pork Ribs with Yam & Wood Ear Fungus

    Ingredients

    • 750 gm Yam/Taro, peeled and cut into chunks
    • 450 gm pork ribs, marinated with some seasalt
    • 30 gm wood ear fungus, soaked, stemmed and cut into strips
    • 2 pieces fermented beancurd (Nam Yue), mashed with some water
    • 1 small knob ginger, smashed
    • 5 cups water or more
    • 1/2  tsp  dark soya sauce
    • Salt and sugar to taste
    • 2 tsp Shaoxing wine
    Method
    1. In a wok, saute the smashed ginger with some oil, add in the marinated pork ribs.  Fry lightly and add in the mashed fermented beancurd paste.
    2. Pour in 3 cups of water, cover and simmer till pork ribs are quite tender.
    3. Add in the woodear fungus followed by the yam chunks.  Add in another 2 cups water and simmer till the pork ribs are tender and the yam softened.
    4. Fine tune to taste with salt and sugar and add in 1/2 tsp dark soya sauce if desired.
    5. Drizzle in some Shaoxing wine and turn off heat.
    6. Dish up and serve with white rice.


    I'm linking this post to the Little Thumbs Up 'Soy' event organised by Doreen from my little favourite DIY and Zoe of Bake for Happy Kids, hosted by Mich of  Piece of  Cake.

Chocolate Lava Cake

0 komentar


The texture of this dessert is somewhat between a fudgy chocolate cake and a brownie, with a crispy outer crust, but moist.  If you like chocolate, I'm sure you'll enjoy it.  I baked them a little longer than the stipulated time as I'd prefer the centre to be a bit more dense and not wobbly.  They rose up beautifully in the oven but once removed, they deflated quite a bit :((  This dessert is yum and I had it on its own, warm but without the 'trimmings' of ice cream or cream.  A word of caution though, one can't be 'greedy' and have it all to oneself as it is very rich and filling (at least to me) ......better to share it!


Recipe for Molten Chocolate Cake aka Chocolate Lava Cake (adapted from Joy of Baking with modifications)

    Ingredients
    • 113 gm unsalted butter, cut into cubes
    • 170 gm bitter sweet chocolate
    • 3 eggs, separated
    • 45 gm sugar (reduced from 65 gm)
    • 1 tsp vanilla
    • a pinch of cream of tartar
    • 1  Tbsp white sugar
    • Some butter and sugar for greasing the ramekins
    Method
    1. Butter 4 ramekins and dust the sides with sugar.  Place on a baking sheet, set aside.
    2. Melt the chocolate and butter over a pot of simmering water, stir well.  Set aside.
    3. Beat egg yolks, sugar till thick, pale and fluffy.
    4. Add in vanilla and fold in the melted chocolate mixture.
    5. Whip up the egg whites till frothy.  Add cream of tartar and beat till soft peaks form.  Gradually add the 1 Tbsp sugar and whip just until stiff peaks form.
    6. With a spatula, fold the beaten egg whites into the chocolate mixture till just incorporated.  Do Not Overmix or Batter will Deflate.
    7. Divide the batter between the prepared moulds.
    8. Bake in a preheated oven for 20 mins. @ 200 deg.C till the edges are set but the middle still looks wobbly and a little wet and cracks appear on the surface.
    9. Serve hot or warm on its own, with some vanilla ice cream or whipped cream.
    10. Yield : 4 servings
    Note :   The batter can be prepared several hours ahead of baking.  Pour batter into respective moulds
                cover with plastic wrap and keep refrigerated until you are ready to bake them.
                The cakes will deflate once the oven is turned off and removed.

 
  • onde-onde © 2012 | Designed by Rumah Dijual, in collaboration with Web Hosting , Blogger Templates and WP Themes